Using the IntelliJ IDEA
IntelliJ IDEA is an Integrated Development Environment (IDE) from the company JetBrains. IntelliJ was developed for the Java programming language, but it also has excellent support for Scala via an official plugin.
IntelliJ is the programming environment most of you used in Programming/Ohjelmonti 1, and because it supports sbt projects, you may use it also in this course.
Danger
Do not activate any AI tools in IntelliJ – using AIs when solving the exercises is considered cheating! (This includes IDEA’s own AI assistant, and extensions such as github copilot.)
On Aalto Linux computers
IntelliJ is already installed on the Aalto Linux machines in the computer labs. To start it open a program menu or terminal and run idea. You can the proceed to Setup below.
Warning
At the moment the A+ plugin is not supported by the IntelliJ version installed on the Aalto Workstations. Download and submit exercises manually as described in the Standard workflow below if you do your exercises on these machines.
Installing IntelliJ on your own computer
Warning
If you already have IntelliJ on your computer Make sure to still update IntelliJ to the latest version!
Updating
You can check for updates by clicking the ‘cogwheel’ icon in the bottom left corner of the IntelliJ IDEA welcome screen (see figure in next section) and pick Check for Updates in the menu that appears. However, note that this may not be sufficient to run this only once if it was long since you installed it.
If you were using IntelliJ during Programming/Ohjelmonti 1 on your own computer, you probably have an old version. This may could cause some issues for you, so we recommend updating. The easiest way to do so is to following the installation instructions below – then you will be asked if you want to uninstall the old version (you can also choose to keep it if you like).
Fresh install
To install from scratch, go to the IntelliJ IDEA Downloads page and pick the installer suitable for your system.
Note that, if you use a package manager (for example on a Linux system) it is likely that you can use this to install IntelliJ directly, without the need to download a separate executable.
After the installation has finished, you should be able to run IDEA from the start/applications menu on your system and be greeted with a welcome screen similar to in the figure below.
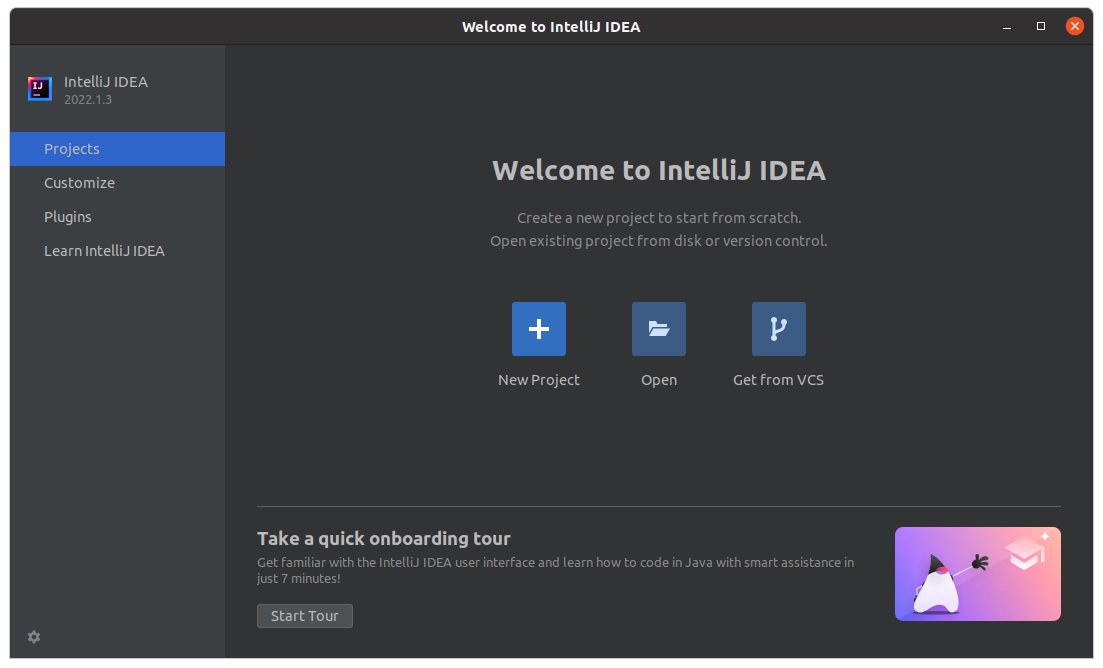
Welcome screen shown when you start IntelliJ IDEA. The tab menu on the left lets you choose between Projects, Plugins, and more. (The ‘cogwheel’ in the lower left corner, this will open a menu allowing you to check for updates, and make advanced settings.)
Setup
There are two ways to work with exercises in IntelliJ: you can download and import the course projects directly, or you can test out the A+ plugin (that you probably used on CS-A1110 Programming 1), which is still an experimental feature this year.
Warning
The support for Programming 2 in the A+ plugin is considered experimental. If you use it you may still have to manually download/submit some exercises.
If you experience problems we highly recommend downloading the zip files and submitting your exercises through the web. Note also that most later courses likely will not use the plugin, so it may still be a good idea to learn how to extract a zip archive and import a project.
Install the Scala language plugin (required) In order to use IntelliJ with the Scala programming language, you will need the official Scala Language plugin. To install it, select Plugins on the welcome screen, and make sure you are viewing the Marketplace. If needed, search for “Scala” in the Marketplace, select the one from JetBrains, and choose to Install it.
Install the REPlace plugin by LeTech (recommended) This plugin by Aalto LeTech provides improvement for the Scala REPL in IntelliJ. Installing this plugin will make it easy to import the exercise packages in to a REPL and work with them. To install it search for REPlace in the IntelliJ Plugins Marketplace.
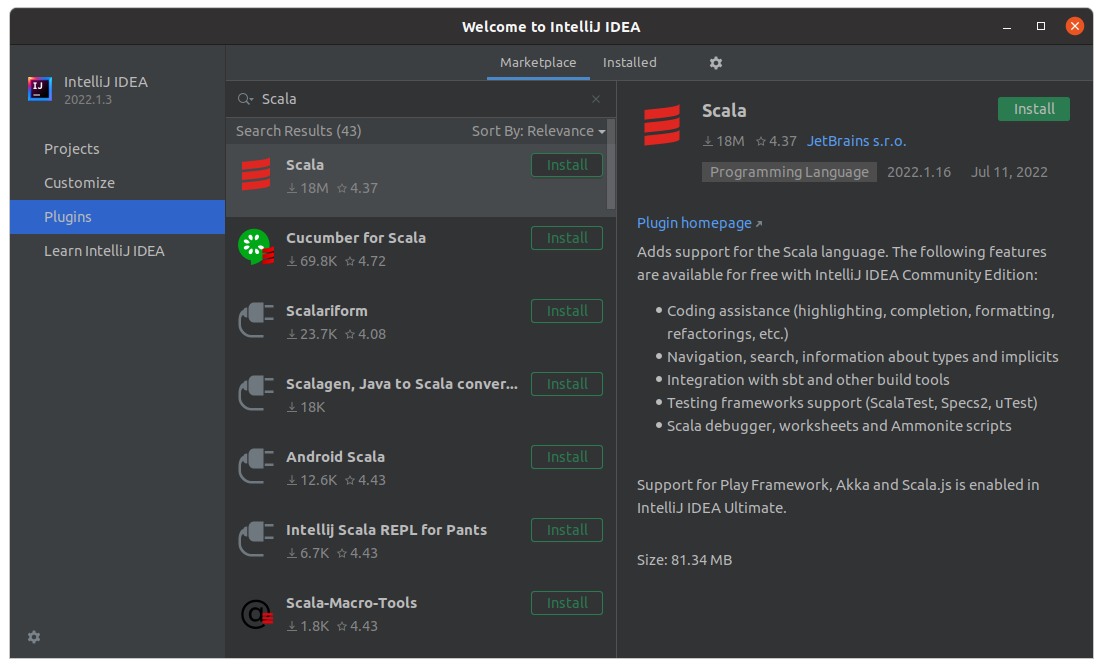
Installing plugins: Select the Plugins tab from the left-hand menu, and make sure you are viewing Marketplace at the top. Then search for and install the plugins you want. In this case the “Scala” plugin from JetBrains.
Danger
Make sure you have updated IntelliJ to at least version before continuing. Also update the A+ plugin if you already have it installed! Then restart IDEA.
Install A+ Courses plugin by LeTech Select Plugins on the welcome screen, and make sure you are viewing the Marketplace. Search for A+ Courses and click install+accept. Restart the IDE. If you already have the plugin, make sure to update it to the latest version!
Create a course project
Select New Project. Make sure that the project type is A+ Courses, then copy and paste the following to the Configuration File URL:
https://gitmanager.cs.aalto.fi/static//CS-A1120_2026Spring/config/o2-aplus-plugin-config.json
Then click Next.
Under Additional Configuration, select JDK 17 (19 and 21 should work as well). If none of these versions are in the drop-down menu, pick Download JDK and select the correct version. Click Next. Restart the IDE if asked.
Give your project a name and select where you want to store it. Click Create.
Get your A+ token (if required) In order for the plugin to make submissions in your name it needs to know the A+ token. If you have used the plugin before it may remember the token, if not you will see request for it as in the figure below. To get it click on the What’s my token? link in the form. It will take you to your A+ account page. Copy the token and paste it into the form. (The token is a ‘secret’, like a password, that allows the plugin to make submissions et c.)
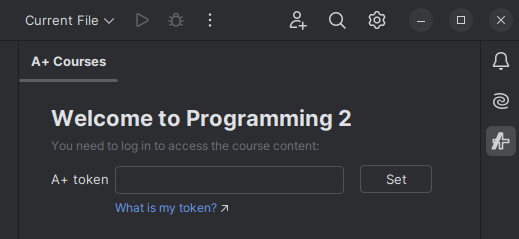
If seeing the following: go to your A+ account page then copy, paste, and set the token.
If you do not see the modules in the A+ tab, then try restarting IDEA or close and open the project.
Working with the exercises
(This is done once for every exercise module.)
Download the exercises module you want to work with from A+ and unpack the archive to a directory.
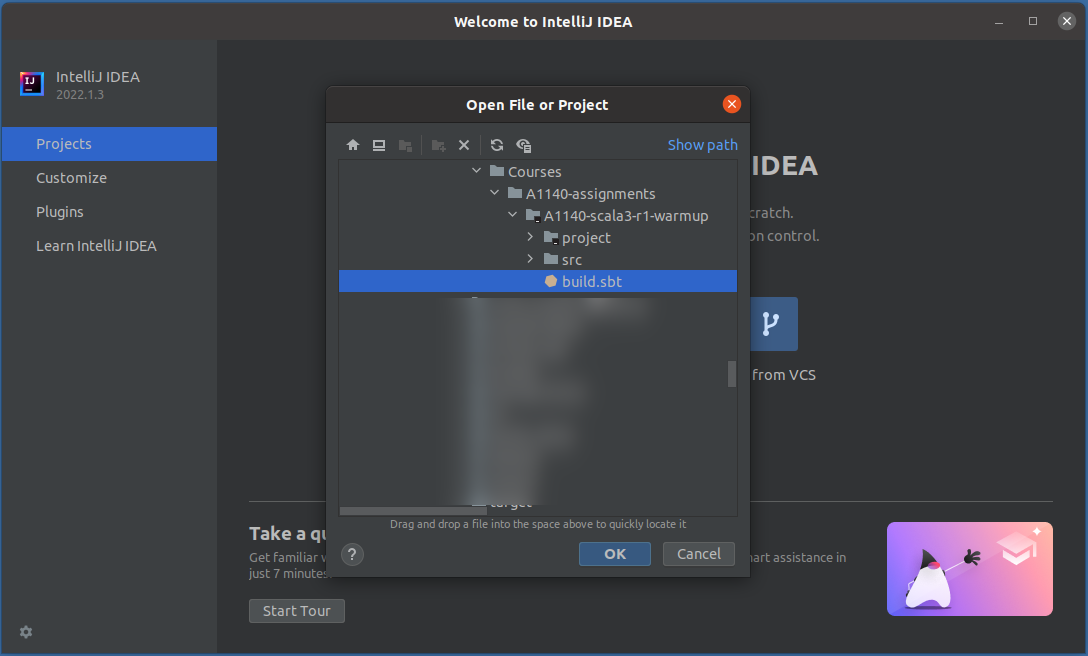
Then use the Open button in the Projects tab on the Welcome screen and navigate to the exercise directory you just unpacked.
Select the build.sbt file (or you can just choose to open the whole folder, but make sure it is the right one). If you are asked how you wish the open, choose Open as a Project (not as a file).
Choose Open from the Project tab and navigate to the exercise folder.
When asked if you want to Trust and Open the project, select Trust Project (you may also want to click in the check-box to automatically trust all projects put in the same containing folder, which is handy if you are only planning on storing course project there).
Note
Treat trust seriously. Build scripts, such as those of sbt, are often full-fledged scripting languages in themselves, and they have the power to read and write files on your computer. For example to seamlessly install missing libraries and execute components as needed. This is why many modern development tools, such as VS Code and IntelliJ, asks you if you trust a project before it imports a project. Take this seriously. If you are uncertain if you trust the authors of a software project you have just downloaded, it is often safest to choose to open it in a preview-mode first. For this course, however, we hope that you trust the teaching staff sufficiently to import the exercises.
IntelliJ will now create the build files for the project, and download any missing Java/Scala libraries needed to build it. The first time you open a project this can take a bit of time.
Go to Modules tab of the A+ extension (on the right-hand side of your IDEA).
Select the module you want to work with, and click Install
Then go to the Assignments tab to select which exercise to work on
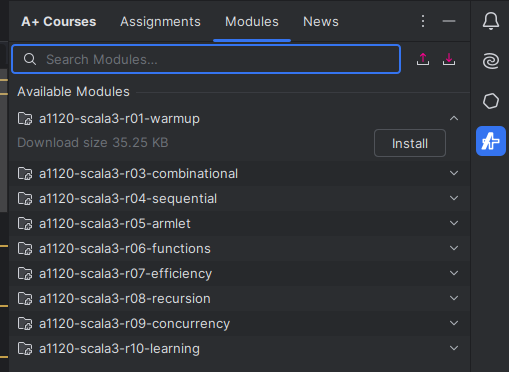
Choose the module you want to download and click Install.
Running tests and code
Source code containing a main function or tests can be run by clicking the ⏵ buttons next to the line number in the source file. You can also right-click on the file name in the Project tab and choose the corresponding Run action from the context menu, or from the Run menu at the top of the window.
Test results and program output are shown in the “⏵ Run” tab at the bottom of the screen.
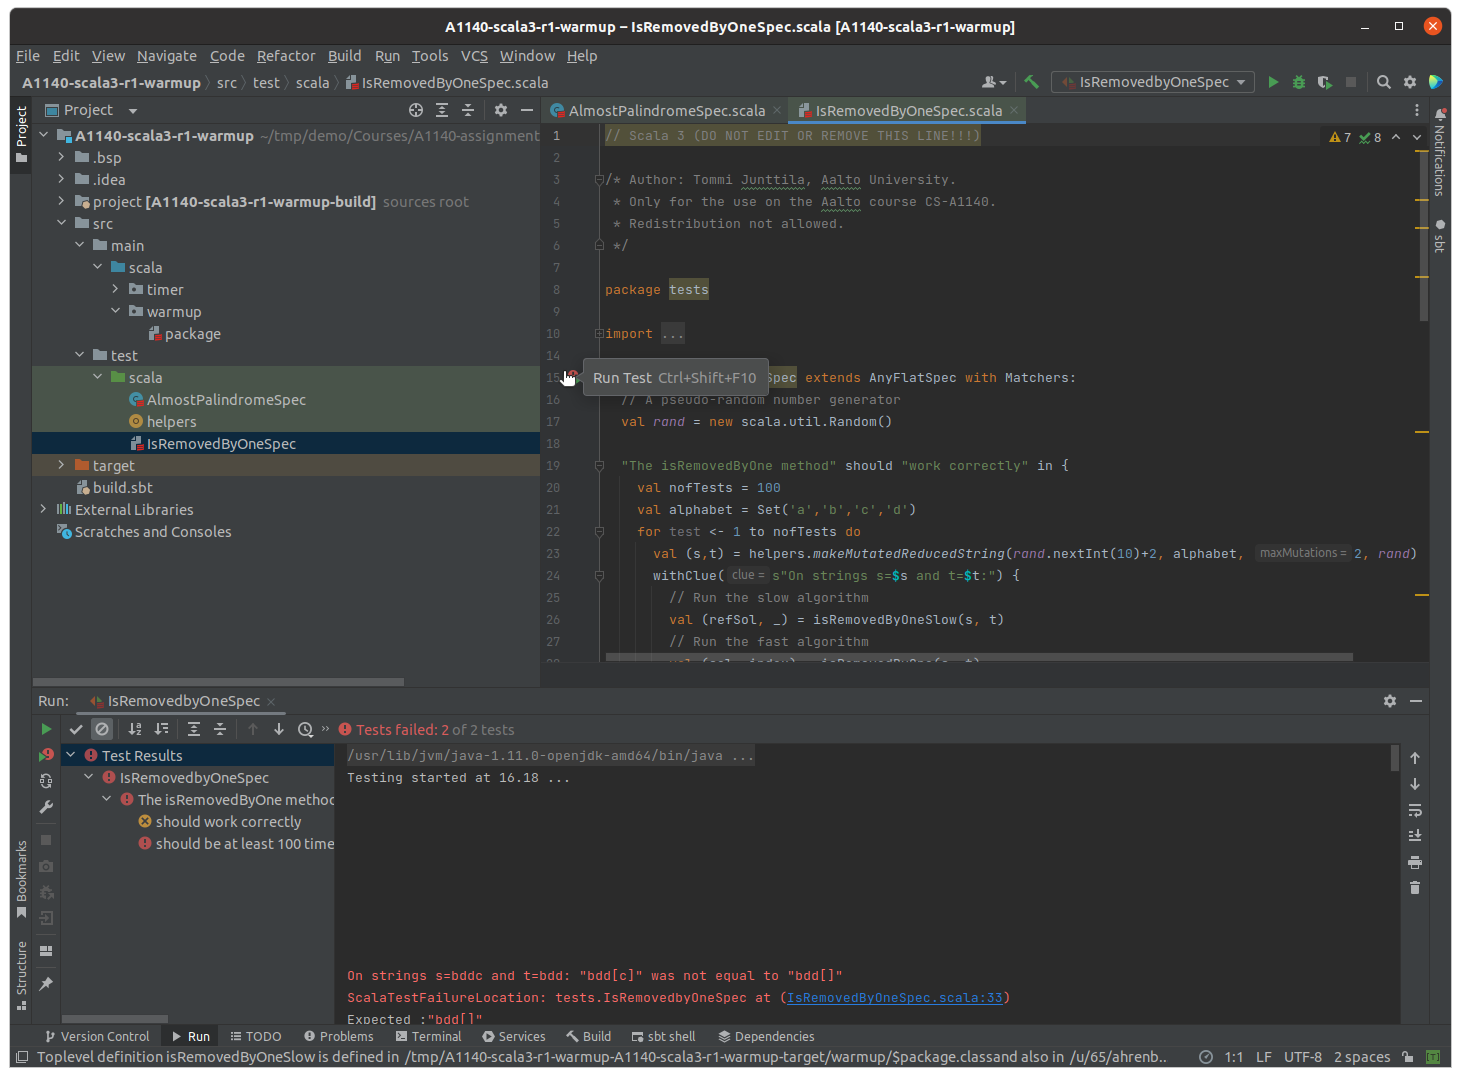
Tests and programs can be run from the source code (for instance) and the output is shown in the “⏵ Run” tab at the bottom of the screen.
Note
Unit tests and A+ grading performs different tasks. Just because your code passes all unit tests does not guarantee a full score by the grader. On the other hand, you may not necessarily need to solve all the tasks in an exercise to submit your solution for grading and get some points. Most exercises award points for every individual task, so you can get points from an exercise even if some unit tests fail. (But in the real world for professional programming, never ship code which fails a unit test.)
Trouble-shooting
Opening a project says that I do not have JDK/SDK installed
This can happen with the A+ plugin. To fix:
File→Project Structure→Project
If the “SDK” drop-down menu says <No SDK> change it to a detected SDK (Temurin OpenJDK versions 11,17,19 should work) or pick Download SDK in the same drop-down and choose JDK 17 from Eclipse Temurin.
Click “OK”
When using the A+ plugin IntelliJ keeps asking for my keyring password
This seems to be an issue for some people. We have reported it to the A+ plugin maintainers who are looking into it. We recommend that you use the “Standard Workflow” described above to load the exercise projects instead of the A+ plugin.
Modules I installed through the A+ plugin do not show in the Project View
(and if I try to edit a file I get an error message)
You might not have updated IntelliJ or the A+ Courses plugin before adding Programming 2. (Or forgot to restart the IDE.) To fix this:
Close the current project
Update IntelliJ IDEA to version 2025.3 or newer. The easiest way to do this is to download and install IntelliJ again. See instructions above.
Make sure that the A+ Courses plugin is up to date
Create a new project, following the instructions above.
If these steps do not work, also make sure that the JDK version you have configured for the project is JDK 17, or 19.
Poblem: scalac: Token not found:
This error message can appear when you run/test/compile a program due to what seems to be an IntelliJ bug. The fix is to stop and then re-start the Scala Compile server before running/testing/compiling the program again. You can do this by clicking on the small watch/meter icon in the bottom right IntelliJ toolbar.
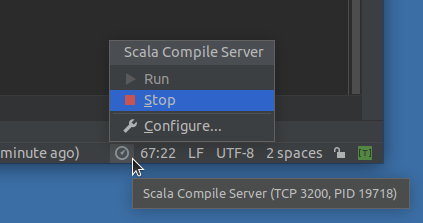
To restart the compile server from this menu, first Stop it then Run it again.
Problem: Package name ... does not correspond to...
If IntelliJ shows you this kind of warning message and underlines the package name in e.g. package sequences, it is because it is trying to check that the module names in the source code corresponds to the file structure. This is required in Java, but not in Scala, and IntelliJ may have it turned on.
You can still work the exercises despite this warning, but if you want to turn it off you can got to Settings→Editor→Inspections, then search for ‘Wrong’ using the search bar. In the resulting list look for Wrong package statement and un-check that box. Then click ‘OK’ to close the dialog. This will disable that check and warnings.
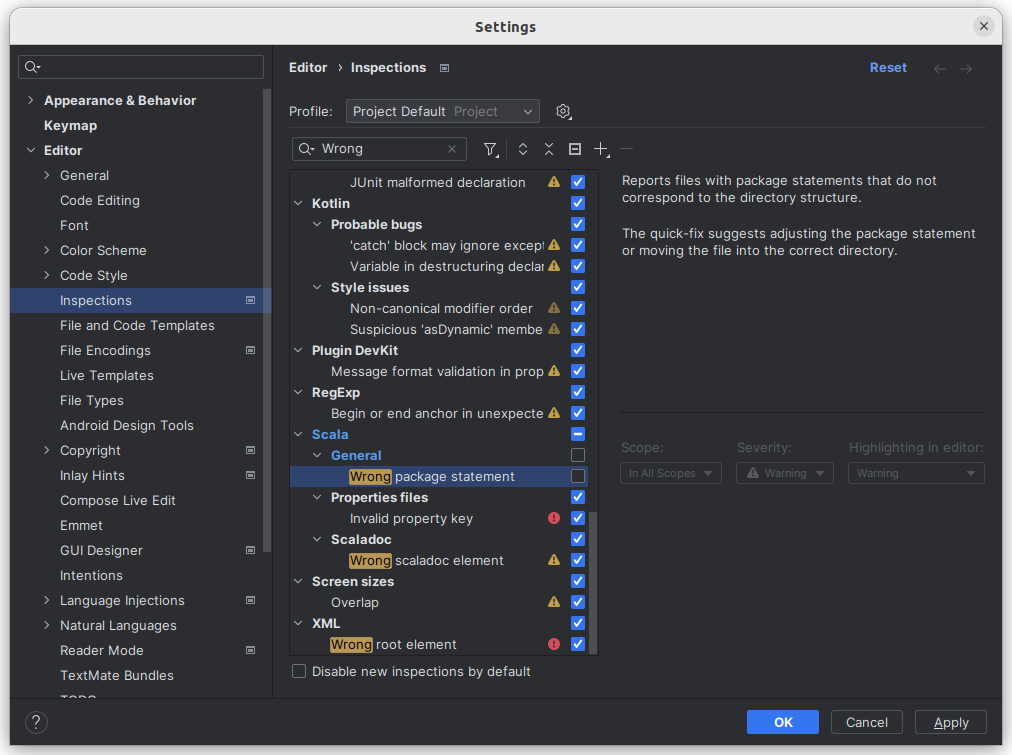
To get rid of the Package name… warnings, turn off the Wrong package statement inspection.