Visual Studio Code is an open-source, cross-platform text editor. Scala is supported via an official plugin. This is a short guide for installing and using Visual Studio Code (VS Code) for working on programming assignments in the course.
(The exercises should work well with other IDE’s or build systems that support sbt builds, so you are free to use your own set-up if you like, although the course staff might not be able to help you with it.)
Danger
Do not activate any AI tools – using AIs when solving the exercises is considered cheating! (This includes github copilot, which Code might suggest, as well as any other extensions providing AI/LLM coding help.)
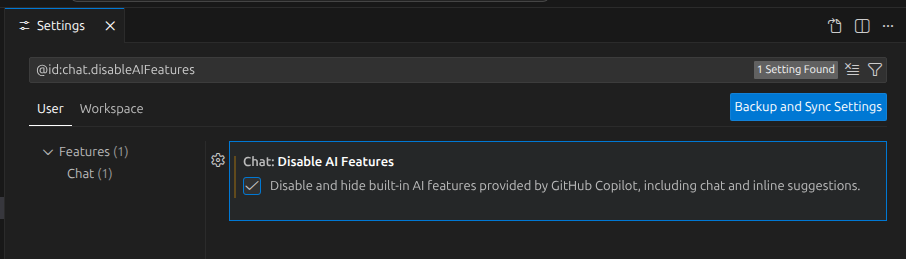
In fact, if you get sick of Code bugging you about AI tools, and the chat taking up UI space, you
can disable these by opening Settings and searching for “Disable AI”. Click the corresponding checkbox. Then restart VS Code for the changes to take effect.
You can later enable them again if you work on projects that require an AI chat.
There is a bug in a software package used by the Scala Metals build-server that reacts with how the home-directories are configured in the exercise classrooms.
Do not store your exercises underDesktop, Download or Documents. Instead create a new folder in your user home directory for the exercises.
You may want to consider using IntelliJ on the Aalto Workstations instead if you are experiencing issues.
A standard version of VS Code is available through the start menu in the Aalto Linux Workstations. Open a menu or terminal and run code.
To use a newer version of code than the default installation (will help if you are experiencing issues) do the following:
Open a terminal
(On VDI remote desktops only) Authenticate to make vscode (and other) software module available: kinit
Load the vscode module by the command: moduleloadvscode/a1120.2025
Start VS Code by the command: code
Do not forget the /a1120.2025 part of the module name. It denotes the version of VS Code used in this course, and contains tweaks to make the Scala plugins work better on VDI.
The VS Code editor should now open, and you are ready to start working.
If this is the first time you start VS Code for the course, make sure to also do the steps under Setup below to install Metals and properly configure Code.
In order to run VS Code with the Scala tools under windows, you will need to install a Java Development Kit (JDK) 17, the sbt tool, and VS Code.
Install JDK: Download and run installer from Adoptium.net While installing, make sure the option to update JAVA_HOME is selected. This is especially important if you have a user name with ‘special’ characters, such as åäö.
Install sbt: Download and run the msi installer from scala-sbt.org (This is to be able to open a scala REPL in the project easily.)
On MacOS it is usually easiest to first install JDK 17 and the sbt tool before VS Code. If you have neither installed already you can use sdkman to install both:
Drag the VS Code application into the Applications folder
Proceed to Scala extension setup below
In order to run VS Code with the Scala tools under windows, you will need a Java Development Kit (JDK), the sbt tool (optional, but recommended), and VS Code.
The methods for installing these varies with distribution, and package manager. For pain Ubuntu:
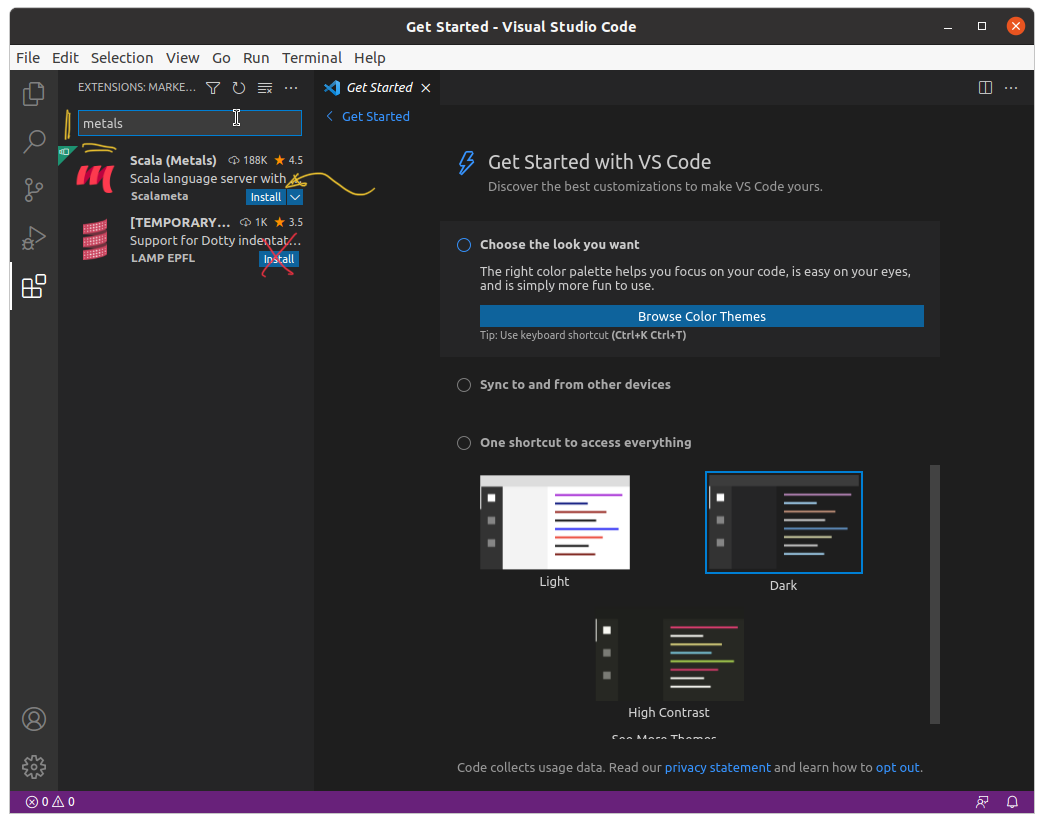
Run the VS Code application, select the extensions tab on the left-hand side, or in the menu View → Extensions
In the search field, search for “metals”, choose Scala (Metals), and hit install. This will install the Metals language server which adds IDE-like features such as code actions, completion, and syntax and error highlighting, among other things that make the development process concise and convenient.
Scala (Metals) is incompatible with the VS Code extensions Scala (sbt) and Scala Language Server. Under Windows 10/11 it may also conflict with the WSL extension. If you have used VS Code previously and have any of these extensions installed, make sure to uninstall or disable them for the assignment workspaces.
If you are using VS Code on an Aalto Workstation do not place the assignment projects under any of the “standard” folders Desktop, Downloads, or Documents (or any other linked folder). Due to an open issue, compilation errors are not handled correctly. Instead, place them under some sub-directory you have created in your home directory.
Open the project: navigate to the menu bar, proceed with File → Open Folder…, and select the extracted assignment folder
Open the assignment folder containing the project and src folders (and the file build.sbt, if you can see it).
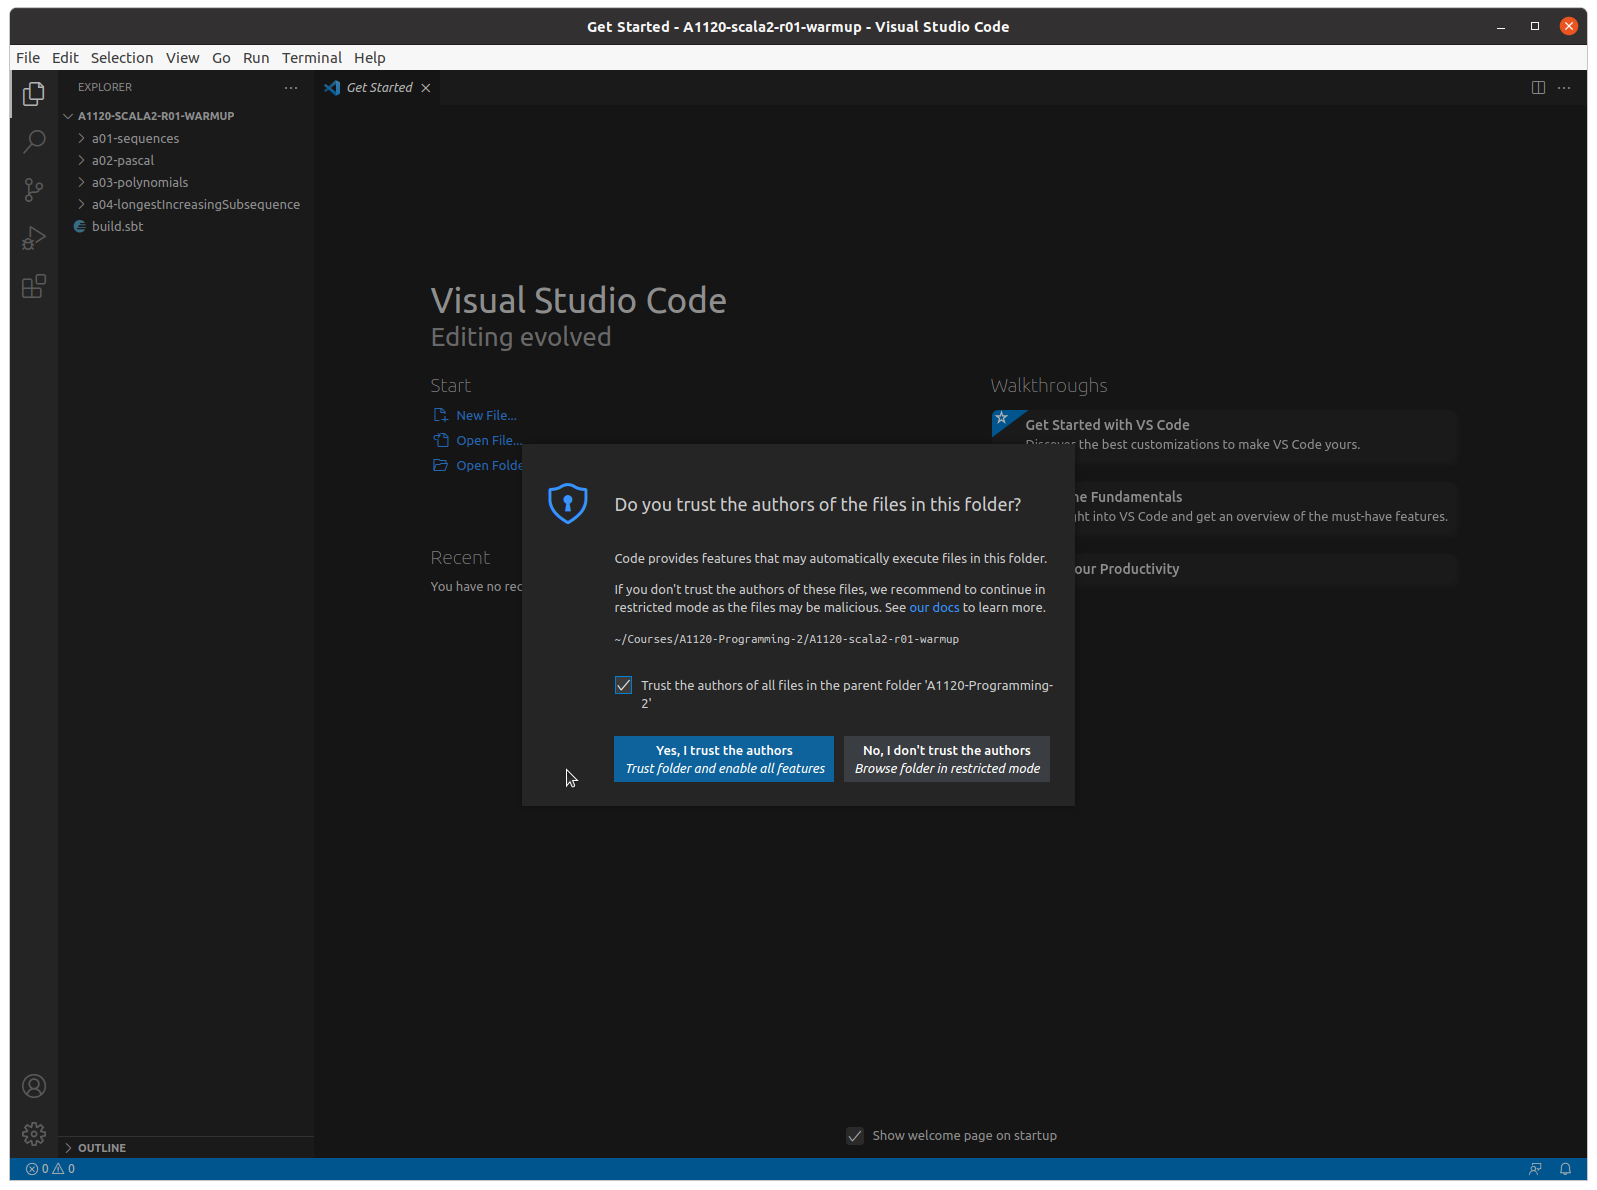
VS Code will show a dialogue asking if you trust the project. You should select Yes, I trust the authors to be able to build and debug the exercise. (If you pick the No option by mistake you can change it later.) If you organise a separate course folder for A1120, you can also tick the box Trust the authors of all files in the parent folder… to prevent this popup every time you import a new exercise.
If asked, you need to select Yes to trust the exercise and activate the build tools.
Note
Treat trust seriously.
Build scripts, such as those of sbt, are often full-fledged scripting languages in themselves, and they have the power to read and write files on your computer. For example to seamlessly install missing libraries and execute components as needed. This is why many modern development tools, such as VS Code and IntelliJ, asks you if you trust a project before it imports a project. Take this seriously. If you are uncertain if you trust the authors of a software project you have just downloaded, it is often safest to choose to open it in a preview-mode first. For this course, however, we hope that you trust the teaching staff sufficiently to import the exercises.
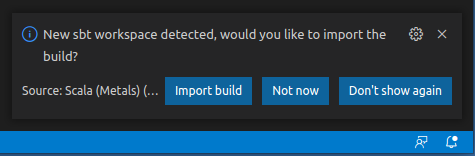
Next, VS Code will detect the assignment workspace and ask what you want to do with it. Choose Import build, and wait while the assignment is set up; progress is displayed in the blue status bar located at the bottom of the window. (If the pop up disappears, do not worry, you can get it back by clicking on the little ‘bell’ icon furthest to the right in the same blue status bar.)
If you do not get prompted to Import the project, make sure you have opened the correct folder or VS Code will not import it as a Scala project. (It needs to be the assignment folder containing the build.sbt file, and the project and src directories.) If this has happened, just close the current folder from the File menu and open the right one.
If this is the first time you open a Scala project VS Code may download and install Metal extension components at this point. This may take a minute or two.
Read the provided program code and documentation
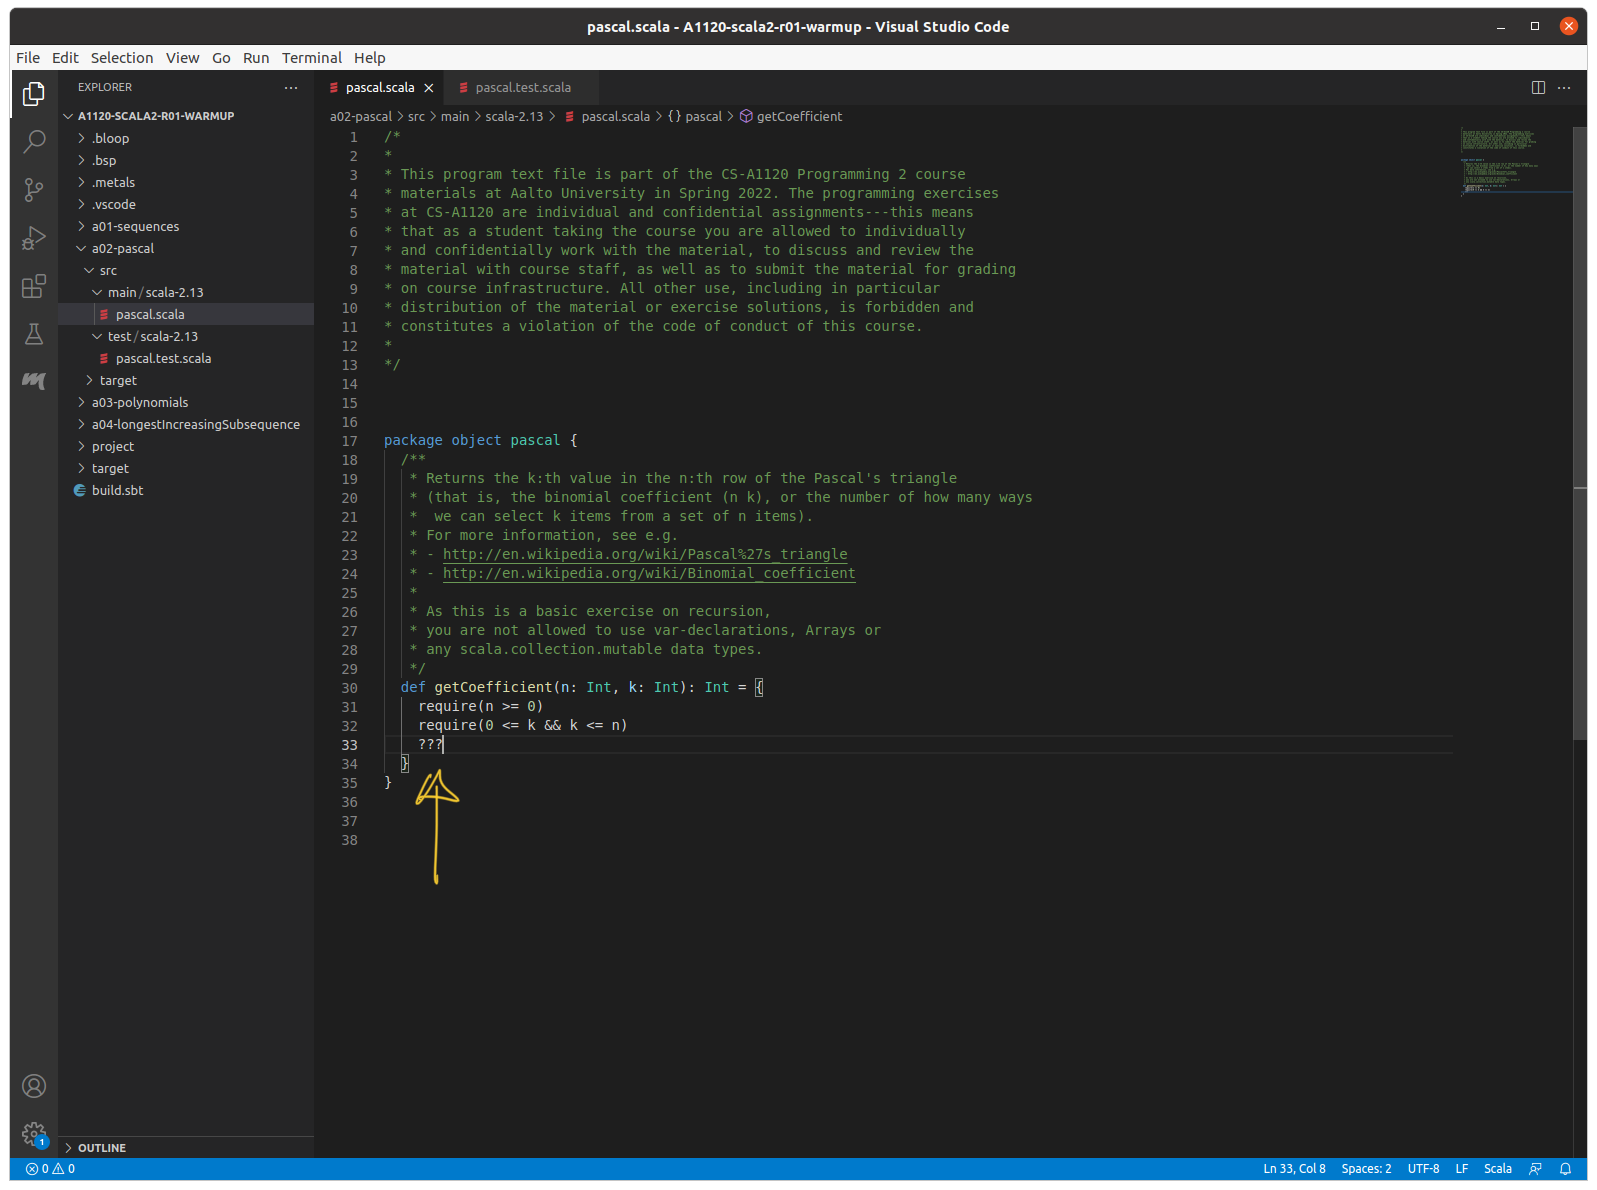
Develop your solution. The places you should insert your code are usually marked with ???
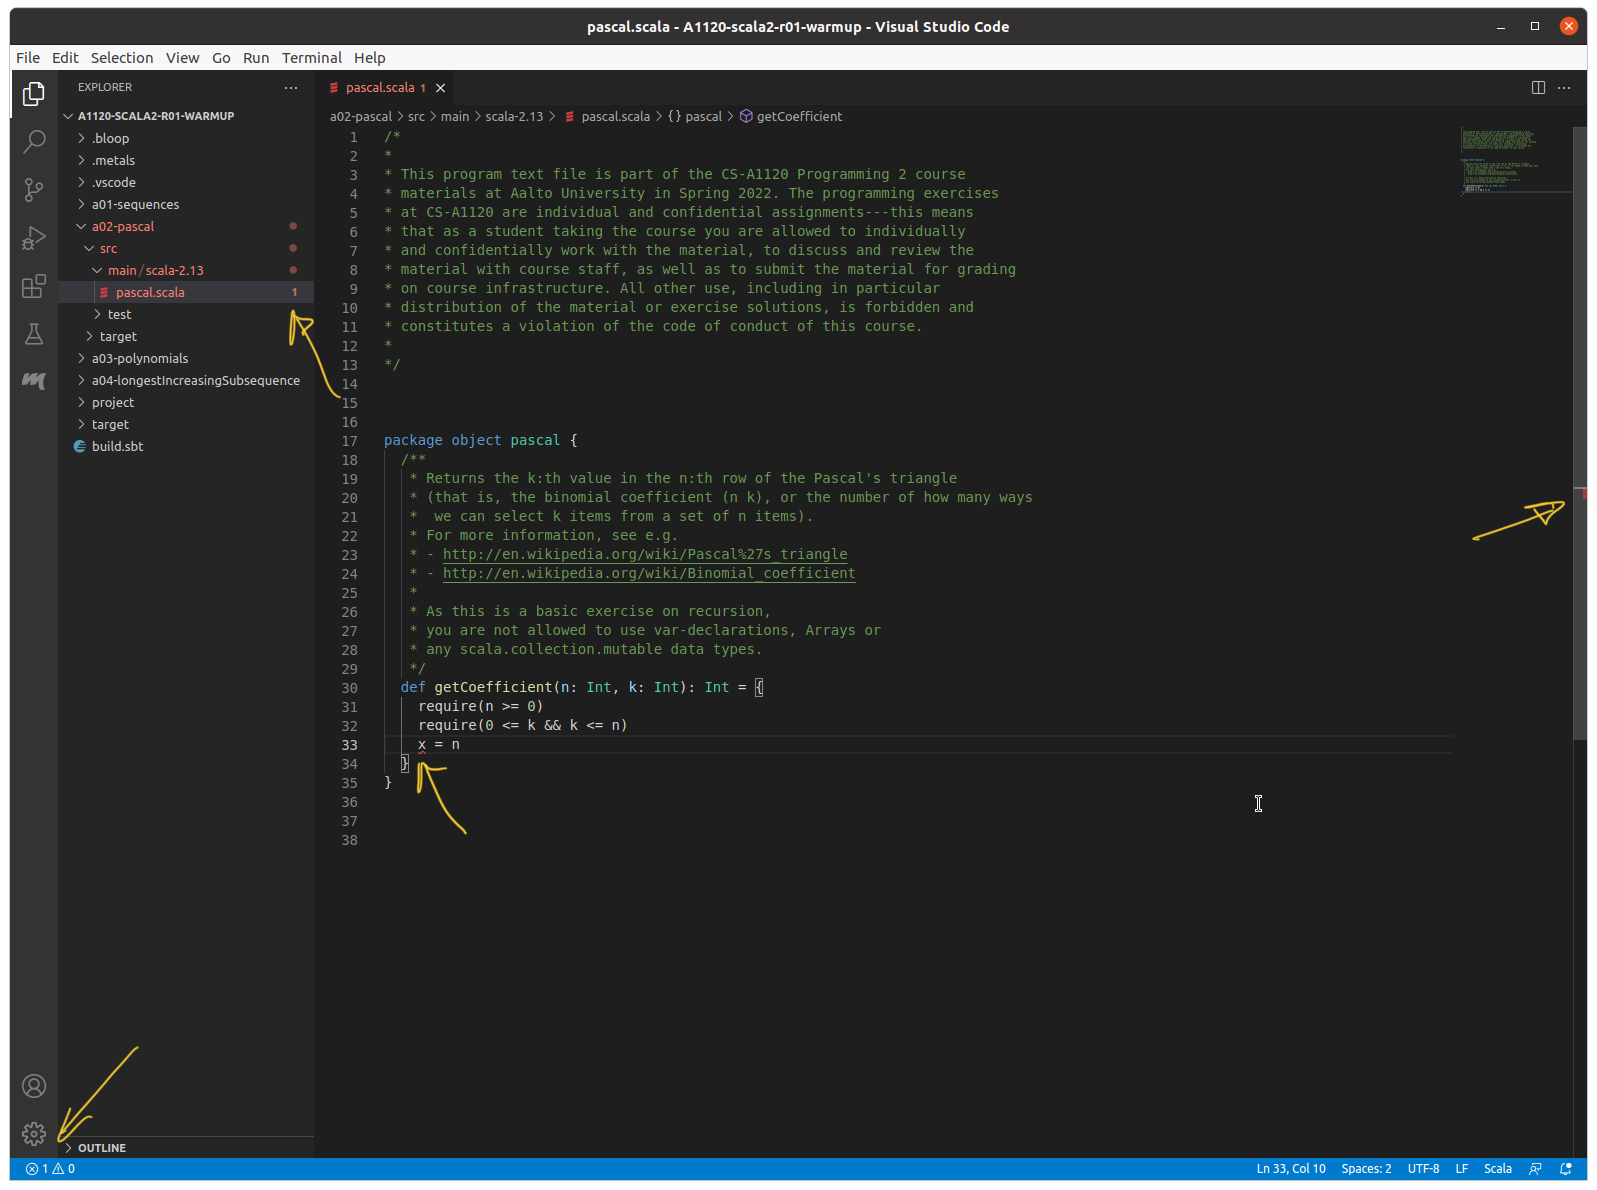
Compilation errors are indicated in the status bar, in the program code, and the explorer. The full error messages are displayed in the problems tab: View → Problems
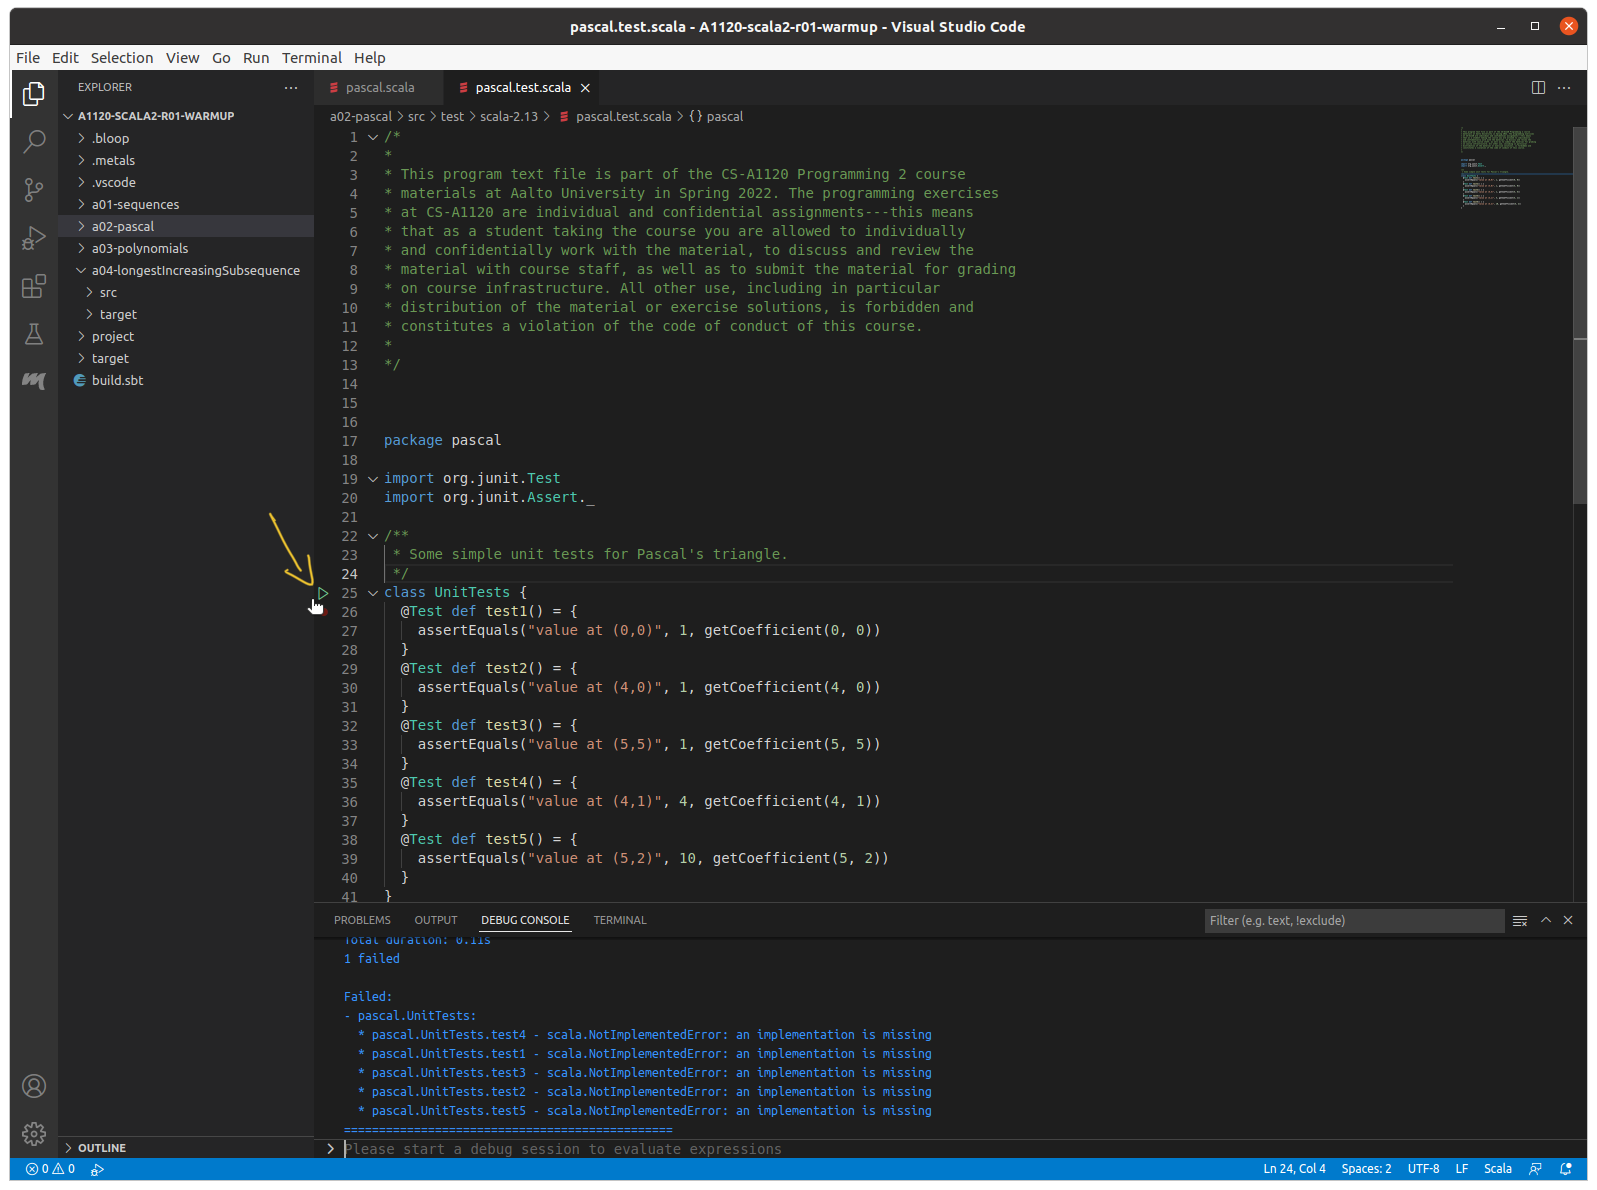
Run tests by opening the corresponding .scala file in the test folder and click on the green ‘play’ ( ▶ ) symbol to the left of the class name. Output will appear in the Debug Console (should appear automatically, otherwise go to View → Debug Console). Note: The test/run links will only appear if your program compiles, so make sure that your code is error-free and saved before testing it. Always run the provided unit tests and check if they pass
Note
Unit tests and A+ grading performs different tasks. Just because your code passes all unit tests does not guarantee a full score by the grader. On the other hand, you may not necessarily need to solve all the tasks in an exercise to submit your solution for grading and get some points. Most exercises award points for every individual task, so you can get points from an exercise even if some unit tests fail. (But in the real world for professional programming, never ship code which fails a unit test.)
When you are happy with your solution, submit the required .scala files to A+ for grading (you can drag-n-drop the files from your system’s file manager/explorer in modern browsers; you can also open a system file manager from Code by right-clicking on a file tab and selecting Open containing folder).
The Test and Run links don’t appear in my source code
First, check that your code is error free and that you have saved it. The links only appear for programs on successful compilation.
Were you asked to import the project when you opened it?
If not, then you may have opened the wrong folder. The most common ‘wrong’ folder is a folder containing the assignment folder (on Windows machines, this can easily happen if the unzip creates a new directory to place the contents in and you choose the outer folder). The result is that the assignment is not recognised as a Scala project. The fix is easy: close the current folder File → Close Folder and open the right one (the one extracted from the zip file containing the “a” directories, and build.sbt).
The assignment folder (containing build.sbt) must be the top folder you open for the project to be recognised (left). If you open a containing folder (even if it has the same name) it will not be recognised (right). If you are not asked to import the project you have the wrong folder.
You were asked to import, but choose not to, or clicked away the pop-up: click on the ‘bell’ icon to bring back the pop-up, or trigger a new import from the BUILD COMMANDS tab (see below), or by closing the folder and opening it again as described above.
If none of the above, the build server may have crashed. It is uncommon, but can happen.
Go to the Metals tab (the m icon in the vertical tool-bar). Under BUILD COMMANDS click on Restart build server. It will take a few seconds for the build server to come up again, you can see the status in the message-bar.
You can then trigger Metals to re-scan the file for compilation by making a small change (e.g. inserting an empty line) and saving the file.
If the above did not work you can also force a re-import of the project by clicking on Import Build in the same menu.
Finally, if the links has stopped working suddenly, it could be that the old build process has crashed. In that case, try to terminate it as described in the next section.
This error happens if you have the Code Runner plugin installed in your workspace. Disable it for the current project and runt code and tests through Metals (see basic tasks for more information about ow to run tests and main programs with Metals).
Check that you do not have an old version of VS Code (if you have installed it previously and not updated it). If so, update it or reinstall it.
If the problem persists:
Make sure JDK 17 was properly installed
In the extensions tab select the cogwheel for Scala (Metals) and open the settings. Find the Metals: Java Home field and fill in the path to the JDK 17 (in windows use explorer, then right-click in the address-bar and select copy-as-text, then paste this value into the field).
Windows 11 : This could be because path to your programming exercise contains spaces. The current release of the Metals build-server does not play nice with all windows 11 paths. Fix: remove the spaces, or install the pre-release of Metals as shown in the next item.
(Windows, if you have a user name containing ‘special’ characters [such as ä and ö] or spaces [on Win11])
Sadly, paths are still not always handled properly, and some with non-ASCII characters in their usernames have reported problems under Windows, where the build server crashes. This should be fixed in newer versions of Metals, so try to update to the newest version if you experience this problem. Alternatively switch to using IntelliJ instead.
Can happen if the wrong, or multiple versions of Java is installed
Make sure JDK 17 was properly installed
In the extensions tab select the cogwheel for Scala (Metals) and open the settings. Find the Metals: Java Home field and fill in the path to the JDK 17 (in windows use explorer, then right-click in the address-bar and select copy-as-text, then paste this value into the field).
Conflicting extensions
If you have either of the VS Code extensions Scala (sbt) or Scala Language Server, uninstall or disable that extension.
A defunct build server process is left on your system
This could be the case if the build process works initially, but then crashes. In this case it is worth trying to terminate the process and restart VS Code:
Shut down Code, then
(MacOS/Ubuntu) open a terminal and run pkilljava to terminate all java processes
(Windows) open the task manager and terminate any running java processes
Restart Code. This should create a new build-server process.
(Windows) Disable WSL for project
If you have previously used Code for other courses or projects, you may have the WSL (Windows Subsystem for Linux) extension installed. This extension can interfere with Scala (Metals). The solution is to disable the WSL extension for your Scala projects (Extensions, WSL, click the drop-down menu at Disable and select Disable (Workspace), then restart Code.)
(OneDrive/iCloud): Some (but not all) users keeping their exercise folders on a cloud drive, such as OneDrive or iCloud, have reported issues with the build server. If you do, and experience problems, it can be worth trying to move the exercises to a location that is not actively synchronised with the cloud.
If you have started VS Code before installing sbt you need to either restart Code or open a new terminal as a terminal is not aware of programs installed after it was opened.
(Windows) You may have to add the sbt directory to your system PATH. See e.g. instructions in this post.
Error: code: No such file or directory (Aalto Linux workstation)
If you get an error message saying code:Nosuchfileordirectory when trying to run code, then you may have forgotten to load the module properly.
A successful call to moduleloadvscode/a1120 will print nothing. If you get an error message here, check that you have typed the command correctly.
If you want to check that the module is loaded you can give the command modulelist.
Error: the following module(s) are unknown (Aalto Linux workstation)
You have probably forgotten to run kinit (if using a remote desktop).
You need to run kinit and load the vscode/a1120 module every time you log in to the VDI workstation
If you get an error message saying Lmodhasdetectedthefollowingerror:Thefollowingmodule(s)areunknown:"vscode/a1120" you may have forgotten to run kinit on VDI
Note
kinit is part of the kerberos suite, a protocol for authentication of network resources. It will ask for your Aalto password in order to provide the extra software modules of which VS Code is a part. In the Aalto computer labs this is done automatically when you log in, but if you connect to a virtual machine you have to do it yourself. This is current Aalto IT policy, however in general, always think twice when somebody asks you to execute a program which asks for your password.
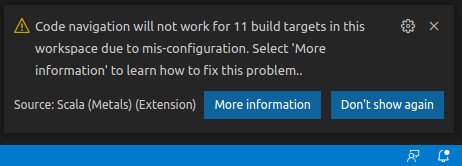
Some recent versions of Scala Metals will somewhat annoyingly pop up a warning saying that code navigation will not work because Java sources are not installed when a project is opened although it will work fine for the assignment project. This message can be ignored - you will still be able to navigate and debug the assignment code.
This warning is shown by some versions of Scala Metals and can be ignored.