From Scala to hardware (*)

From Scala to bytecode for the Java Virtual Machine (*)
Our quest for Module I: The mystery of the computer, obtaining an understanding of the computer, is nearing a conclusion. Recall our motivation for this module, namely the brief fragment of Scala that took the sum of the first four billion positive integers.
Let us wrap a roughly similar fragment of code (without the timing printouts) inside a function and an object that we can compile:
object test {
  def main(args: Array[String]) : Unit = {
    var i = 1L
    var s = 0L
    while i <= 100000000L do {
      s = s + i
      i = i + 1
    }
  }
}
Note
If you want to try the examples in this section yourself you will need the Scala compiler, scalac installed on your computer. Alternatively you can build them with sbt or Visual Code, in which case you can find the .class files in the target directories.
Assuming that the above is saved to a file test.scala,
we can now compile the code with scalac the Scala compiler (on the command line):
> scalac test.scala
This will produce the compiled class files that can be loaded/imported for execution
on the Java Virtual Machine (JVM). Looking in the directory you will see three new files
test$.class, test.class, and test.tasty.
The .tasty file is specific to the Scala 3 compiler, and contains type information (compiling to Java byte code looses some high level type information; you can read more about it here), while the .class files represents the program as understood by a Java Virtual Machine.
(The reason there are two class files created from a single object is due to how Scala produces Java classes. One is for the class information, and the other for the object.
We will be looking at test$.class which corresponds to the bulk of the program above, but you can use the
same method to look inside the other file if you like.)
So, how do these class files look like, and how does the Java Virtual Machine operate?
Let us use the javap utility program to disassemble
the bytecode
(the instructions) for the JVM and inspect the compiled class
file test$.class to see what it looks like, in more
human-readable form. The following command will disassemble the file test$.class that we compiled to above:
javap -private -c test$ > test$.javap
(Note that if you do not have JDK in your terminal path the command javap might not be available.) The switch -private means show all members, and -c means disassemble. test$ is the name of the class (in this case, the file without the .class ending) we want to disassemble. The command will print out the result to the terminal, so the last part > test$.javap will redirect this text into a text file called test$.javap.
Here is the content of test$.javap:
Compiled from "test.scala"
public final class test$ implements java.io.Serializable {
  public static final test$ MODULE$;

  private test$();
    Code:
       0: aload_0
       1: invokespecial #13                 // Method java/lang/Object."<init>":()V
       4: return

  public static {};
    Code:
       0: new           #2                  // class test$
       3: dup
       4: invokespecial #16                 // Method "<init>":()V
       7: putstatic     #18                 // Field MODULE$:Ltest$;
      10: return

  private java.lang.Object writeReplace();
    Code:
       0: new           #22                 // class scala/runtime/ModuleSerializationProxy
       3: dup
       4: ldc           #2                  // class test$
       6: invokespecial #25                 // Method scala/runtime/ModuleSerializationProxy."<init>":(Ljava/lang/Class;)V
       9: areturn

  public void main(java.lang.String[]);
    Code:
       0: lconst_1
       1: lstore_2
       2: lconst_0
       3: lstore        4
       5: lload_2
       6: ldc2_w        #29                 // long 100000000l
       9: lcmp
      10: ifgt          26
      13: lload         4
      15: lload_2
      16: ladd
      17: lstore        4
      19: lload_2
      20: lconst_1
      21: ladd
      22: lstore_2
      23: goto          5
      26: return
}
The disassembled code appears, of course, like something that is really
intended for a machine. Yet, given our hard-won knowledge of the
armlet architecture, and our knowledge of the Scala source code,
we should not be completely lost with the disassembler output. A helpful resource is this Wikipedia List of Java bytecode instructions.
So let us put some effort into reading the output.
Take a careful look at the disassembled code above.
Look at the mnemonics such as “lload”.
We observe that there are
load instructions (e.g. “
lload”),constant-loading (that is, immediate-data-loading) instructions (e.g. “
lconst_1” and “ldc2_w”),store instructions (e.g. “
lstore”),comparison instructions (e.g. “
lcmp”),arithmetic instructions (e.g. “
ladd”), andcontrol instructions for branching (e.g. “
ifgt”) and jumping (e.g. “goto”).
In fact, after some reflection, it looks like the code is qualitatively
not too far from armlet code!
From an architectural perspective there is one key difference
between the JVM and the armlet. Namely, the armlet is
a register machine that computes with register contents, whereas
the JVM is a stack machine that computes with the contents of
the topmost elements of an operand stack.
Let us decorate the disassembled code of function main
a little bit to see what is going on. For ease of study, we also
recall the source code again:
object test {
  def main(args: Array[String]) : Unit = {
    var i = 1L
    var s = 0L
    while i <= 100000000L do {
      s = s + i
      i = i + 1
    }
  }
}
Below is the line-by-line decorated disassembly. We display both the operation and the contents of the operand stack after each operation is executed. The stack top is always the rightmost element (if any). Here we go:
public void main(java.lang.String[]);
  Code:              // Operation                            Stack contents (-->top)
                     // -----------------------------------  -----------------------
   0:   lconst_1     // Push constant 1L to stack            1L
   1:   lstore_2     // Store stack top to local var 2 (=i)  (empty)
   2:   lconst_0     // Push constant 0L to stack            0L
   3:   lstore 4     // Store stack top to local var 4 (=s)  (empty)
   5:   lload_2      // Load local var 2 to stack            i
   6:   ldc2_w #29   // Load run-time constant #29           i 100000000L
   9:   lcmp         // Compare top elements of stack        (result of comparison)
   10:  ifgt 26      // Branch to 26 if i > 100000000L       (empty)
   13:  lload 4      // Load local var 4 to stack            s
   15:  lload_2      // Load local var 2 to stack            s i
   16:  ladd         // Add top elements                     s+i
   17:  lstore 4     // Store stack top to local var 4 (=s)  (empty)
   19:  lload_2      // Load local var 2 to stack            i
   20:  lconst_1     // Push constant 1L to stack            i 1L
   21:  ladd         // Add top elements                     i+1L
   22:  lstore_2     // Store stack top to local var 2 (=i)  (empty)
   23:  goto 5       // Jump to 5                            (empty)
   26:  return       // Return control to caller             (empty)
We observe that apart from the stack-based instead of register-based
computations, the JVM and the armlet are quite close relatives.
(In fact, save for the limited 16-bit word length of the armlet
one machine can simulate the other with ease.)
A second example (*)
Let us strengthen this intuition by writing a selection sort in Scala
(recall our armlet selection sort earlier) and disassembling
the resulting JVM bytecode. Here we go:
object test2 {
  def selnsort(aa: Array[Int]) : Unit = {
    val n = aa.length
    var j = n-1
    while j > 0 do {
      var candmaxidx = 0
      var i = 1
      while i <= j do {
        if aa(i) > aa(candmaxidx) then {
          candmaxidx = i
        }
        i += 1
      }
      val t = aa(j)
      aa(j) = aa(candmaxidx)
      aa(candmaxidx) = t
      j -= 1
    }
  }

  def main(args: Array[String]) : Unit = {
    val n = 10
    val aa = new Array[Int](n)
    var i = 0
    while i < n do {
      aa(i) = n-i
      i += 1
    }
    selnsort(aa)
  }
}
And here is the javap-disassembled file test2$.class,
which we have decorated with comments:
Compiled from "test2.scala"
public final class test2$ implements java.io.Serializable {
  public static final test2$ MODULE$;

  private test2$();
    Code:
       0: aload_0
       1: invokespecial #13                 // Method java/lang/Object."<init>":()V
       4: return

  public static {};
    Code:
       0: new           #2                  // class test2$
       3: dup
       4: invokespecial #16                 // Method "<init>":()V
       7: putstatic     #18                 // Field MODULE$:Ltest2$;
      10: return

  private java.lang.Object writeReplace();
    Code:
       0: new           #22                 // class scala/runtime/ModuleSerializationProxy
       3: dup
       4: ldc           #2                  // class test2$
       6: invokespecial #25                 // Method scala/runtime/ModuleSerializationProxy."<init>":(Ljava/lang/Class;)V
       9: areturn

  public void selnsort(int[]);
    Code:                         // Operation                            Stack contents (-->top)
    				  // -----------------------------------  -----------------------
       0: aload_1		  // Load local var 1 (=aa)               aa
       1: arraylength		  // Get length of array                  aa.leng
       2: istore_2		  // Store stack top to local var 2 (=n)  (empty)
       3: iload_2		  // Load local var 2 (=n)                n
       4: iconst_1		  // Push constant 1 to stack             n 1
       5: isub			  // Subtract                             n-1
       6: istore_3		  // Store to local var 3 (=j)            (empty)
       7: iload_3		  // Load local var 3 (=j)                j
       8: iconst_0		  // Push constant 1 to stack             j 0
       9: if_icmple     69	  // Branch to 69 if j <= 0               (empty)
      12: iconst_0		  // Push constant 1 to stack             0
      13: istore        4	  // Store to local var 4 (=candmaxidx)   (empty)
      15: iconst_1		  // Push constant 1 to stack             1
      16: istore        5	  // Store to local var 5 (=i)            (empty)
      18: iload         5	  // Load local var 5 (=i)                i
      20: iload_3		  // Load local var 3 (=j)                i j
      21: if_icmpgt     48	  // Branch to 48 if i > j                (empty)
      24: aload_1		  // Load local var 1 (=aa)               aa
      25: iload         5	  // Load local var 5 (=i)                aa i
      27: iaload		  // Load array element                   aa(i)
      28: aload_1		  // Load local var 1 (=aa)               aa(i) aa
      29: iload         4	  // Load local var 4 (=candmaxidx)       aa(i) aa candmaxidx
      31: iaload		  // Load array element                   aa(i) aa(candmaxidx)
      32: if_icmple     39	  // Br. to 39 if aa(i)<=aa(candmaxidx)   (empty)
      35: iload         5	  // Load local var 5 (=i)                i
      37: istore        4	  // Store to local var 4 (=candmaxidx)   (empty)
      39: iinc          5, 1	  // Increase local var 5 by 1 (=i)
      42: goto          18	  // Jump to 18                           (empty)
      45: aload_1		  // Load local var 1 (=aa)               aa
      46: iload_3		  // Load local var 3 (=j)                aa j
      47: iaload		  // Load array element                   aa(j)
      48: istore        6	  // Store to local var 6 (=t)            (empty)
      50: aload_1		  // Load local var 1 (=aa)               aa
      51: iload_3		  // Load local var 3 (=j)                aa j
      52: aload_1		  // Load local var 1 (=aa)               aa j aa
      53: iload         4	  // Load local var 4 (=candmaxidx)       aa j aa candmaxidx
      55: iaload		  // Load array element                   aa j aa(candmaxidx)
      56: iastore		  // Store array element                  (empty)
      57: aload_1		  // Load local var 1 (=aa)               aa
      58: iload         4	  // Load local var 4 (=candmaxidx)       aa candmaxidx
      60: iload         6	  // Load local var 6 (=t)                aa candmaxidx
      62: iastore		  // Store array element                  (empty)
      63: iinc          3, -1	  // Increase local var 3 (=j) by 1       (empty)
      66: goto          7	  // Jump to 7                            (empty)
      69: return		  // Return to caller                     (empty)

  public void main(java.lang.String[]);
    Code:
       0: bipush        10	  // Push constant 10 to stack            10
       2: istore_2		  // Store to local var 2 (=n)            (empty)
       3: iload_2		  // Load local var 2 (=n)                n
       4: newarray       int	  // Create new int array (=aa)           aa
       6: checkcast     #39       // Check type of stack top (class "[I") aa
       9: astore_3                // Store to local var 3 (=aa)           (empty)
      10: iconst_0		  // Push constant 0 to stack             0
      11: istore        4	  // Store to local var 4 (=i)            (empty)
      13: iload         4	  // Load local var 4 (=i)                i
      15: iload_2		  // Load local var 2 (=n)                i n
      16: if_icmpge     33	  // Branch to 33 if i >= n               (empty)
      19: aload_3		  // Load local var 3 (=aa)               aa
      20: iload         4	  // Load local var 4 (=i)                aa i
      22: iload_2		  // Load local var 2 (=n)                aa i n
      23: iload         4	  // Load local var 4 (=i)                aa i n i
      25: isub			  // Subtract                             aa i n-i
      26: iastore		  // Store array element                  (empty)
      27: iinc          4, 1	  // Increase local var 4 (=i) by 1       (empty)
      30: goto          13	  // Jump to 13                           (empty)
      33: aload_0		  // Load local var 0 (=test2)            test2
      34: aload_3		  // Load local var 3 (=aa)               test2 aa
      35: invokevirtual #41       // Invoke method selnsort               selnsort(aa)
      38: return		  // Return to caller                     (empty)
}
Again we observe that the Scala compiler has turned what we wrote in Scala into an implementation of the insertion sort in bytecode.
Bytecode beyond our examples (**)
More generally,
Chapter 6
of the JVM Specification
contains a complete description of the instructions supported by
the JVM. In particular, we observe that there are dedicated instructions
to operate on operands of different types, which are indicated by
the prefixes of the instruction mnemonics.
For example, iload loads an Int, whereas
lload loads a Long, and
aload loads a reference to (the memory address of) an object.
At this point we encourage you to compile package armlet or
some other more substantial program written in Scala. Then disassemble
some class files. What you will discover in the output of the disassembler
is bytecode that implements exactly what the programmer has instructed
in Scala.
Thus, what we discover is that the Scala compiler is a program for turning program text written in the Scala programming language into bytecode for the Java Virtual Machine.
From bytecode to hardware (*)
An implementation of the Java Virtual Machine is a program that executes the compiled bytecode on actual hardware (or in yet another layer of virtualization/simulation).
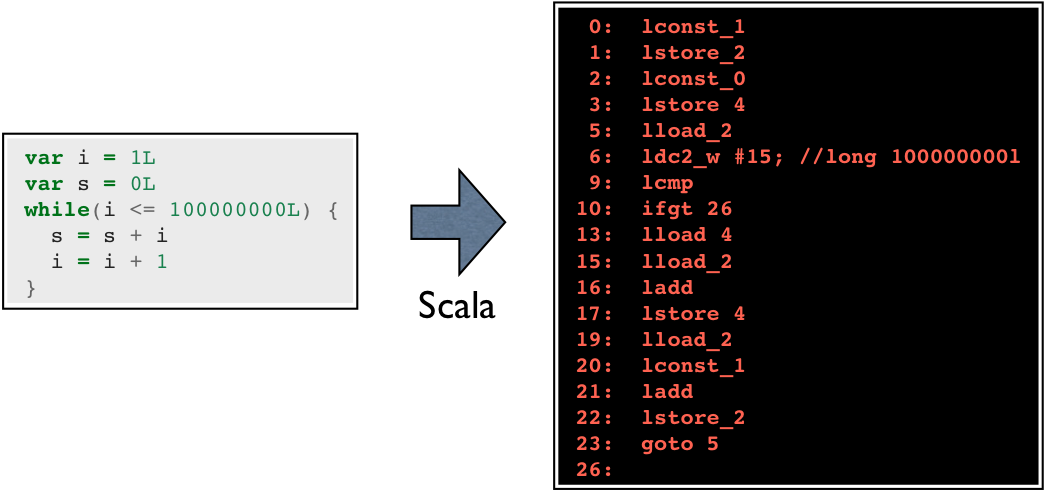
Before looking at what a JVM implementation does to the bytecode, let us recall the original Scala program and its transformation to bytecode via the Scala compiler:

Let us assume the JVM implementation prepares the bytecode for execution on actual physical hardware. For example, let us assume the target hardware is a 64-bit Intel microarchitecture.
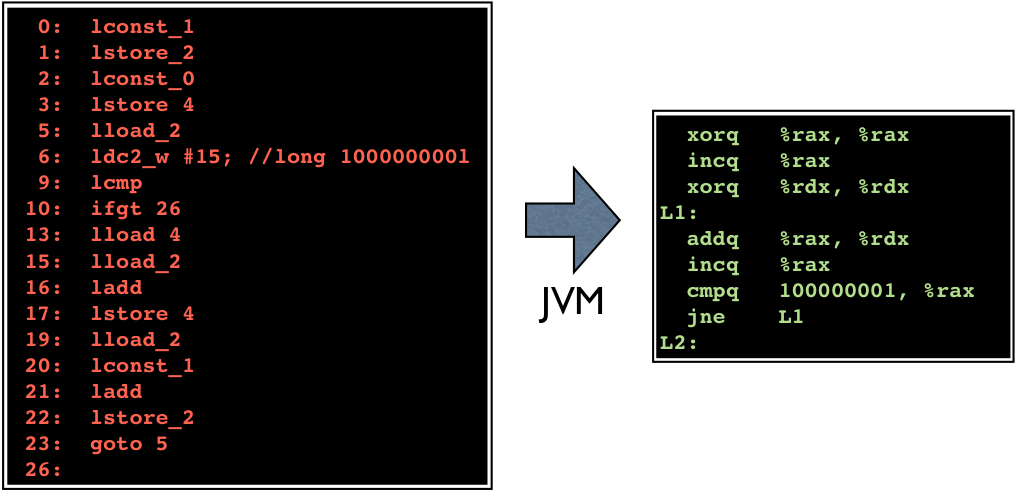
The JVM implementation optimizes the bytecode and then transforms it to machine language of the target architecture. For clarity let us first display the machine language in symbolic form:

Observe how the Intel 64 machine language again bears
resemblance to our humble armlet machine language.
Of course a physical platform operates in binary,
so the actual machine language is not symbolic but
binary, which we display in hexadecimal below:

So all in all, our original Scala program gets transformed into the following \(23\times 8=184\) -bit binary sequence:

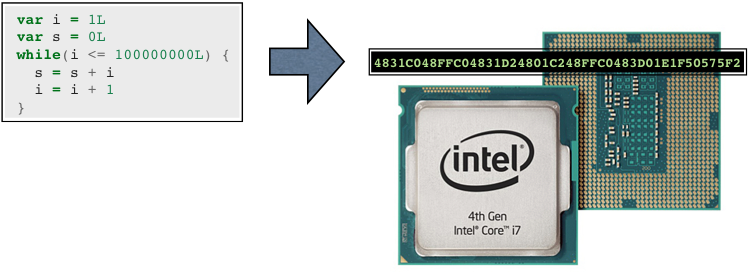
This binary then gets executed by the actual physical processor (say, an Intel Core i7) at a rate of several billion instructions per second.